Sharing experiences from my life, places I have visited, crafts I have created, and hoping to inspire other people in this journey we call life.
Tag: Love
WordPress database error: [Table './wordpress/wp_users' is marked as crashed and last (automatic?) repair failed] SELECT * FROM wp_users WHERE ID = '1'
I have been sewing for years, having learnt most of my techniques from my sewing teacher at high school. That was approximately 46 years ago! Over time I have been able to sew most things, so my teacher did a pretty good job of teaching me. Having a seamstress as a sister was also pretty helpful, and she was great for giving advise or help when needed.
About 6 months ago, I decided to recover the squabs in our caravan, and looked to ‘You tube’ for instruction. I wanted to make box shaped squab covers. I had the idea of how to make them, but watching a video of someone else sewing these covers, helped to confirm the technique. It was while I was watching them, that I saw of a new process to me, of putting zips in. And I used that process on the squab covers. It was so much easier and quicker than my old way.
Here is the process.
I am making a cushion cover and this is a fat quarter that I am using for the back of the cushion. It needs an opening for the soft pillow insert. The best way for that opening, is to put in a zip that is just under the size of the width of the cushion. I have folded over the top of the fat quarter and sewn a seam about a half inch in. This seam is sewn in the biggest stitch possible, as it will be taken out at a later date. A big stitch length is easier to unpick!
Cut open the fold
Overlock the seam edges, and press open the seam.
Now place the zip on top of the seam, making sure that the zip opening is right on top of the sewing stitches.
Sew the zip in with the zipper foot on your sewing machine. It is a little tricky around the zip pull. I stop sewing, adjust the zipper pull, and then restart sewing again.
You can see by the photo above, that I have stopped sewing about 2 inches from the edge. This is so I can undo the seam a little to allow the zip pull to move away from the sewing machine zipper foot. Now just finish sewing the zip in.
This is what it looks like on the good side of your cushion cover
Carefully use your seam ripper to undo the first seam that you made
And you now have a zip in the back portion of your cushion cover. How easy was that?
I had already made the front of the cushion cover.
As I like to bind the edge of the cushion, all I have to do is place both pieces together and overlock the edges. This helps to keep it all neat and tidy while you commence the binding.
The two pieces are held together by the overlocked edges. Note both good sides are facing out.
For the binding, I cut strips of material at 2 and a 1/2 inches wide. Place the corners at 90 degrees, good sides facing each other, and stitch diagonally across both pieces
iron the seam open
and cut the edge off to leave about a quarter inch
Press the seam open again, nice and flat 🙂
Make sure that you have enough binding to go right around the edge of your cushion. You need to leave an nice long tail as you start sewing. When you have gone around, stop about 8 inches from the start point. You will need to lay the long tail from the start on top of the binding left over at the finish. The overlap needs to be the same size as the width you cut the binding. Mine is 2 and a 1/2 inches. Cut the two and a 1/2 inch overlap and discard the rest of the binding. You can join the two together , and you will have the exact amount left to finish off binding the whole cushion.
When you get to a corner, you will need to sew up to a quarter inch before the edge. Turn the material, and sew off the corner. Fold the binding back on itself and then down the direction of the next side. You can then put the pressure foot down, and keep sewing. This will make a perfect corner when you turn the binding over to the back.
Fold the binding around to the back and stitch into the ditch on the good side. This will catch the binding on the back and sew it all down nicely. You will need to fold and turn the corners to match with the front.
Undo the zip and insert your soft pillow insert and zip up again. You now have a completed cushion to admire and cuddle up to 🙂
The challenge is for you to make one as well (or more). Follow my instructions and make a few scatter cushions for your home, or as gifts for friends and family. Please send me a photo of your creation in the comment section below 🙂
WordPress database error: [Table './wordpress/wp_users' is marked as crashed and last (automatic?) repair failed] SELECT * FROM wp_users WHERE ID = '1'
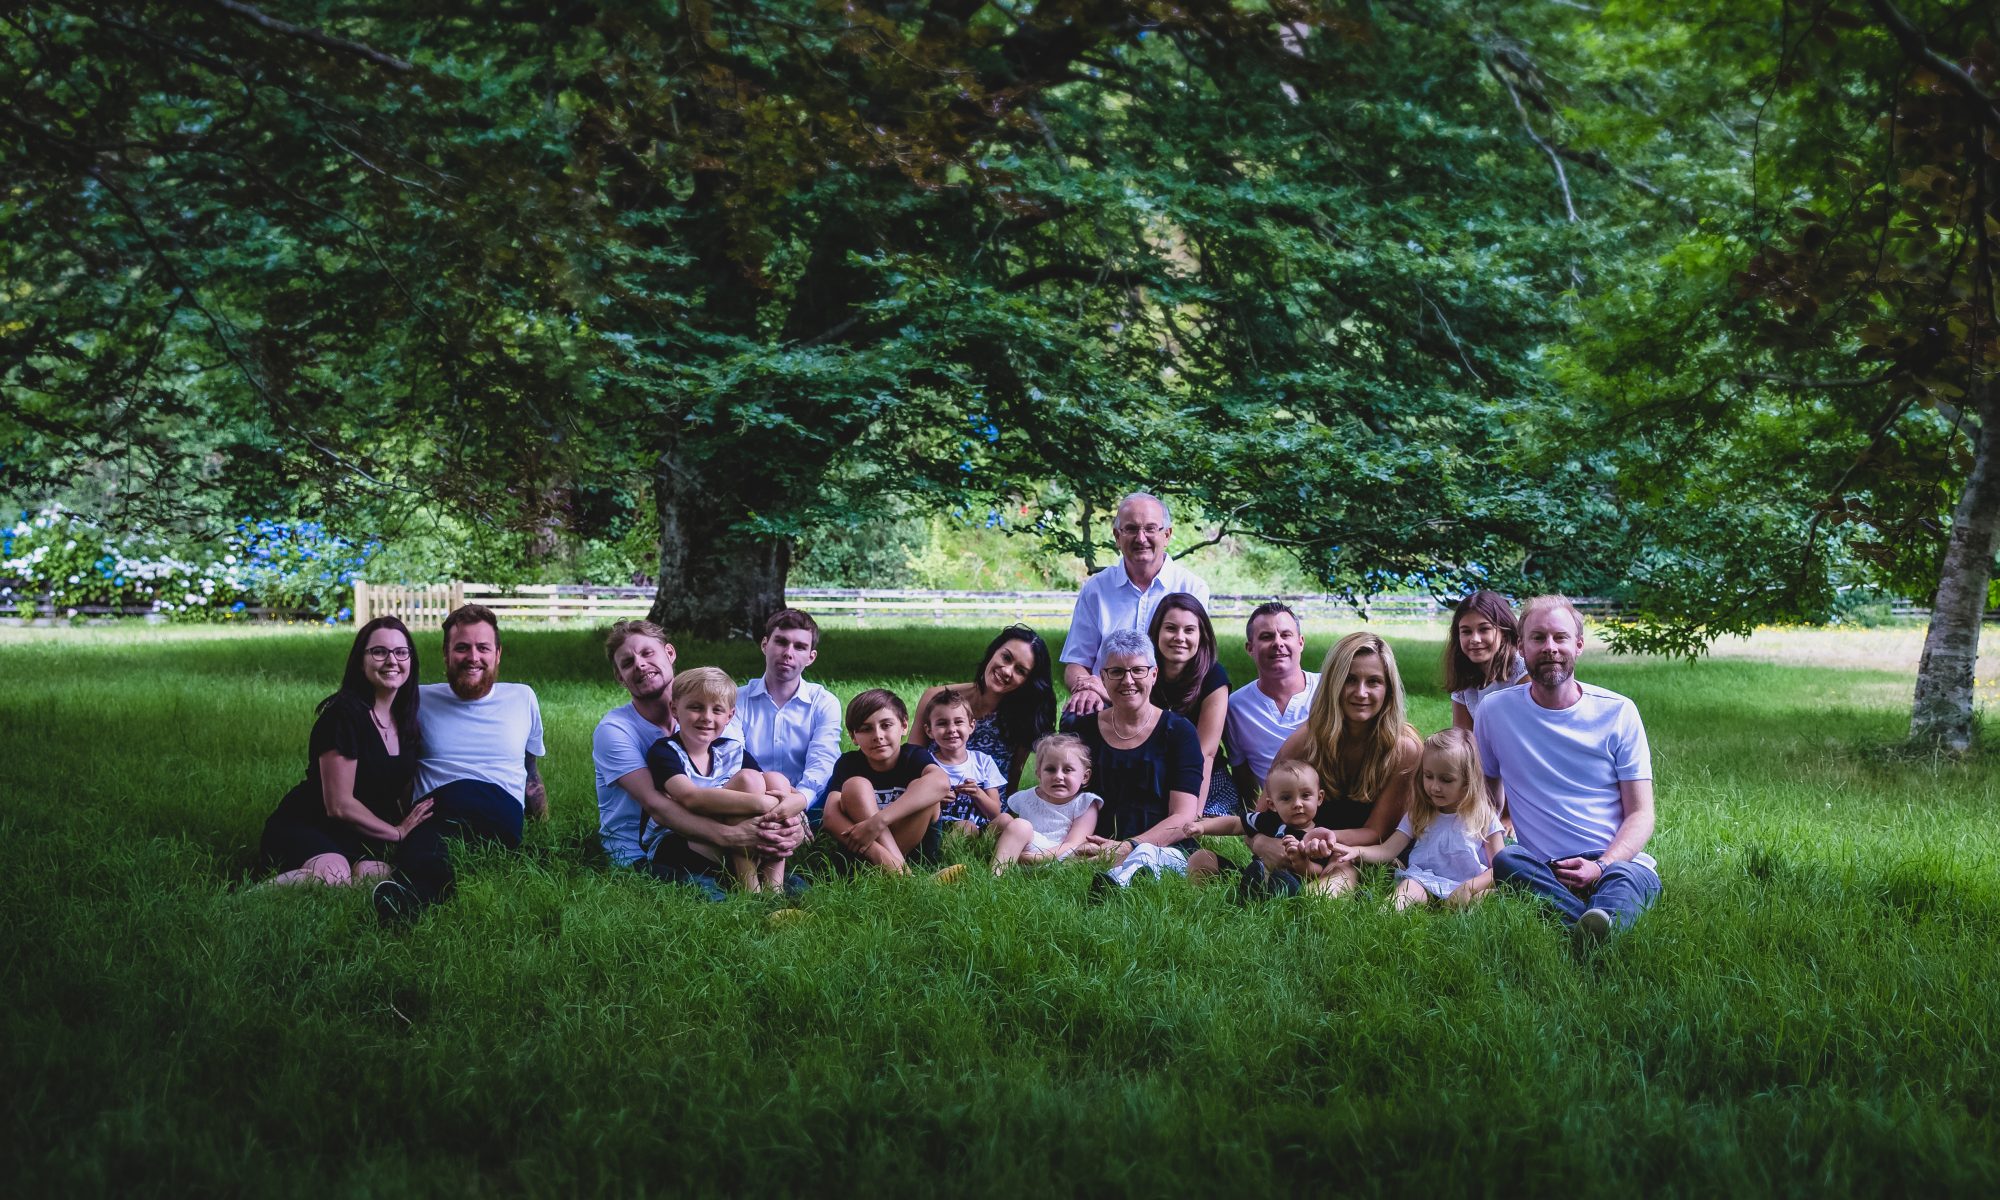
This Christmas has been wonderful! I have had all of my 6 adult/children home, along with their partners and children. The only one missing was our beautiful eldest grand daughter. She lives in Sydney, is starting a full time job as a nurse this March, and because of work commitments over the holidays, she had to stay home. She was certainly missed!
To get most of our family in one place and at the same time is a miracle!
We have one son, with his wife and two children, living in London; We have another living in Sydney, with his wife and three children; We have another son, and his wife, based in Sydney, but travelling all over the world; We have another son, and his three children, living here at home with us; We have a daughter living in Auckland, New Zealand; And we have another daughter living in our home town who is in the process of building a new home. Can you see how amazing it has been to actually get them all home?
We have had 17 of us living together over the holidays, and actually 18 for a couple of nights. My home has been full, and I have been so happy. A happiness that fills me to overflowing. It’s so hard to describe, but I feel like I am in love with each of my family members all over again! They are all great people, and I am so proud of each and every one of them. I am so happy with how they all embraced the time together, and how they all loved each other in spite of all the differences between us.
In honour of having us all together, I wanted to have a few family photos taken. I love photos, and the memory moments they give us all, forever! My eldest daughter is a very talented photographer (and the second to eldest as well), so we arranged a time, and a place, and C5 took some photos. The last time we managed to get group photos taken was in December 2009. We have had four more grand children born since then, so I felt we really needed an updated photo.
Family photo from December 2009Family photo from January 2018
Oh my, we have all aged in the last 8 or so years! But those years have been great, and we have all matured in personality, character and experiences. I can imagine the many stories each can tell from those past 8 years.
Our 4 grand children from December 2009Our Grand children from January 2018. Our eldest grand daughter is missing from the photo.
The three eldest in the back row are the three with our eldest grand daughter in the photo above this one! Four more grand children added and three of them were born in 2014 in February, March and April! Three grand children born within three months 🙂 The youngest grandson turned one last November.
If you have visited my blog before, you will see that I now have a new blog header (that is the photo you see when you get to my site) and that header is our new family portrait! That is my whole family, minus 2! Our eldest grand daughter and one daughter in law are missing, but all of my adult children are in there, and their families.
I love it!
WordPress database error: [Table './wordpress/wp_users' is marked as crashed and last (automatic?) repair failed] SELECT * FROM wp_users WHERE ID = '1'
There is nothing like a baby being born to get me in the mood to create!
Over the years I have made hundreds (a slight exaggeration) of bibs, cuddle blankets, leggings, little tops, cardigans and bootees. And, if you search through my past blog entries you will see that for my youngest three grandchildren, I made each of them a crochet blanket, and I also made them patchwork ones.
Robins niece had her second little baby girl on the 18th of April. It’s nearly a month later, and today I finally popped in to meet little Fable and give her our gift! I spent all day yesterday finishing the blanket off, and it turned out great! (even if I must say so myself) I was so happy with the finished blanket that I thought I would share the process with you, my reader. There are often little tricks with Patchwork that make something that looks very complicated, actually quite easy to put together. Of course the material choices make quite a difference to the finished product as well, and that is often trial and error. Luckily the combination of fabrics looked great this time.
Awhile ago Spotlight had a sale on and I purchased 8 different materials that would blend together, and about a quarter of a metre of each one. I then purchased two different plain fabrics that matched one of the colours in the fabric pieces. I got approximately a metre and a half or two metres of this solid colour fabric.
So here are the instructions…
Firstly I cut the 8 different materials into 3 inch strips (each is the full width of the material). I then match two groups of four strips. Here are the blue/green strips.Keeping the colours in order, I sew them together with a quarter inch seam.The last of the pink/yellow selection sewn together.And you end up with two long strips, each of four different materials. Please note these have been pressed neatly. I have my iron out and going the whole time I sew, and press the materials frequently.Now to measure and cut. Even up the ends of the strips first.You need to cut the material up as wide as it is high, right along the long strip. I got four big squares off each one.Here are the two groups of four squares.Keeping the patterns in order line them up beside each other with one colour group having its stripes going at a 90 degree angle.Put the two different ones together with the right sides facing each other and sew a quarter inch seam right around the outside of the square.Sew neatly around the outside edge 🙂From corner to corner cut with your rotary blade, then spin around and cut the opposite diagonal.You should end up with your large square cut into four like this!Press the seams and turn over. Voila! Look at that! Aren’t they so pretty! These four have been placed making a little mixed square in the centre.Or you could place them with the little triangles to the outer corner. Or you could mix them up totally. The last way is extremely hard to keep control of when sewing together. I get lost! So I kind of like to still have some order (among the chaos).Once all four big squares have been cut up, place them together again in the way that you want to sew them up.Sew up each row making sure to press the seams once finished.Then sew the four rows together. Don’t they look pretty 🙂On this blanket I chose the green with little pink flowers for the first border. Sew on the top and bottom first and then the edges. Make sure to slightly stretch the border material as you sew. This makes it easier for the quilt to keep shape, and for the top stitching later on.My next border was a very cute yellow tree pattern sewn exactly the same way as the green border.Because this is a smallish quilt (or blanket) there is no need to top stitch through all layers. On this one I have added the wadding to the back, and if you look closely, I have top stitched through both of the layers. This keeps the blanket looking neat and holding together well after many washes. There are many ways that you can top stitch on a quilt. I have just made quarter inch lines along each side of the seams and it looks very tidy.Now I have added the backing and finished the outer rows of top stitch through all the three layers.The next stage is the binding. I cut three inch strips and joined them together to make one big long strip. Fold it in half and iron the fold.With the cut edges together sew the binding on stopping about a quarter of an inch from the corner and sew diagonally off the edge.Turn the cloth around and fold the binding to have a straight edge along the top, then just recommence sewing the seam.Iron the binding out from the edge and fold it around to the back. At the corners fold the binding in the same way as you did when you were sewing and they will just fit together nicely. I then stitch in the ditch on the front of the blanket, and it catches the back and sews the binding down neatly. you can hand stitch this part if you want the stitching to be completely hidden.And here are the two quilts that I made in two days. I must admit that each one took all day, but they were wet days and not a lot else could be achieved, except housework! And that is always there to do anyway!All folded up ready to be given to two very special little babies. Fable got the green edged one, and Zoe got the pink edged one.
Now I find that there is no greater pleasure than to give a gift that you have hand crafted. I pour my love into the blanket as I sew it up and I imagine the little baby that I am making it for, laying on it, kicking their little feet happily. I pray a little blessing on the child and hope that the Mummy enjoys seeing her child playing on the pretty blanket.
I also get a great sense of satisfaction seeing how the colours and patterns fit together. These two blankets had the inside panels the same and yet the outside borders were completely different creating a unique blanket for each child.
I hope that the instructions are clear enough and you can now be bold enough to attempt your very own patchwork quilt or blanket. Let me know how it goes! Send me a photo of your one finished so I can enjoy the colours and patterns that you have created.
ENJOY 🙂
WordPress database error: [Table './wordpress/wp_users' is marked as crashed and last (automatic?) repair failed] SELECT * FROM wp_users WHERE ID = '1'
I have been back home now for nearly a month, and I’m loving it!
It’s funny how you never really appreciate something until you have to do without it for awhile. The saying goes ‘Absence makes the heart grow fonder’, and although this saying is describing relationships, I also believe it covers things like homes, or familiar places, or towns. If you have been reading my blog over the past six months, you will remember that I left New Zealand on the 15th of August last year and didn’t return again until the 12th of January this year. That is nearly five months away from my country and home town of New Plymouth. Actually we live just out of New Plymouth at a small town called Waitara, but New Plymouth is just a short 15-20 minute drive away and is our nearest city, and yes, I love it!
Walking back into my home, I fell in love with it all over again. Yes it is old, and still has a lot of work needing to be done on it, but it is very comfortable, welcoming, peaceful, and spacious. It is our 16 year old renovation project that will probably never get finished, but it has served us well! It has been a family home to 5 of our 6 children and all the extras that they have brought here over the years. We have had many friends and visitors pop in to see us and maybe stay a day or more and I trust that they have felt the welcome, not only from us, but by the atmosphere that this house helps to create.
Look at this amazing view! This is what I see from my dining room table when the Wisteria is in flower.Looking across our deck towards the lounge French doors. The Wisteria is beautiful but does take a bit to keep under control.
I have been thinking about why I am so happy to be home. Yes I do love my house and it’s in a great location in the country and yet handy enough to get to town within 20 minutes, so that is part of the reason. But I think it’s the fact that New Plymouth is such a fabulous city. We have everything here from a Mountain to the sea, and plenty of parks inbetween, as well as the fact that it is a great shopping city.
Let’s start with the view I see from my own front yard!
This is the view from my front deck. If you look through the tree you can see our Mountain!And this is the view of the Mountain from just across the road from our house.
If I drive south for 20 minutes I would come to the small town of Inglewood. About 15 minutes away from my house heading towards Inglewood, I get this amazing view!
Our wonderful Mount Taranaki. I never tire of this view.
And every winter I try to get up the mountain to the snow at least once. It’s such fun to have our Mountain so close and to have the ability to drive up right to the snow.
A photo from our trip up the mountain last winter (2014)
And after a play in the snow and you are feeling a little hungry, a stop at Volcano View Café is great for food and play. With flying foxes available for use, and BIG carts to ride. The kids (and big kids) love it 🙂
One of the two Flying Foxes at Volcano ViewThere’s a selection of Carts to ride 🙂
Leaving Volcano View and heading towards New Plymouth and the next place to stop would be at Lake Mangamahoe. This lake supplies New Plymouth with it’s water. It is very picturesque and also a great lake for hiking around. When you get there, you will find that you can get a great photo with the mountain in the background.
Lake Mangamahoe and Mount TaranakiAnother beautiful photo of Lake Mangamahoe with our amazing mountain in the background 🙂
Next place towards New Plymouth is the ‘Meeting of the waters’. Here you can go for a walk to the river, swim, or take some rafts and get out on the river. It’s also a great place for a picnic, a walk or just for relaxation.
Take the family, the rafts and have some fun together at the ‘Meeting of the waters’ 🙂There are plenty of places to have a picnic surrounded by lovely scenery
We have the most amazing park right in the centre of New Plymouth that is very popular and well worth a visit. There are many magnificent trees and gardens all over the park, along with a Fernery house to wander through. There is also a playground for the children that has recently been updated with new playground equipment, and the children love it.
The flying fox at the Park playground
There are two big lakes. One with a fountain and the other you can hire row boats and take the family or friends for a row. If you would rather have coffee or lunch than get out on a boat, then you can go to the Tea Rooms. There you can sit and relax and also have a lovely view of the lake.
The main lake at Pukekura Park and looking at Poets Bridge. Just above the bridge you can see the Mountain. A very popular photograph to take 🙂And here’s Robin taking us out for a row on the lake
The waterfall at the park looks great during the ‘Festival of Lights’ Christmas Season. The whole park is lit up over that time and is known about New Zealand wide. It is spectacular! There are also stages set up over the season and for a super evening, you can take a blanket, invite friends along and spend the evening relaxing and listening to the various performers on stage.
The lights on the bottom lakeThe top lake and poets bridge.Another photo of the lights at the top Lake in Pukekura Park.This is the grand childrens favourite part of the Festival of Lights. The ultraviolet lights 🙂 We all try to wear something white!
Walking through the park, you will end up at the “Bowl of Brooklands’. It is an amazing outdoor sound shell where we often have performers to entertain. There is nothing more special to sit on the hills with wonderful company, and listen to a well known band or watch a production/show. The Christmas at the bowl held each year is very popular and finishes off with a huge fireworks show.
This is the view from the stage! Imagine performing on this stage with a crowd seated all around in the grassy hills. Now imagine it at night with everyone holding candles. It looks amazing and has a great atmosphere!
And just up the hill from the Bowl of Brooklands is our very own zoo. Sorry but the most exotic animal are the monkeys, but it’s still a great zoo. It has a fantastic playground and is very good for young children. With gates and both ends, young Mums can relax while the children have fun in a safe environment. There are some elephants there but only the type seen in the next photo 😉
The three grand children with the elephants at Brooklands Zoo.
We have a famous garden just west of New Plymouth in the mountain range called The Pukeiti Rhododendron Gardens. Every year we have the Rhododendron Festival and it happens during the flowering season of the trees. Hundreds of tourists come into New Plymouth to visit the gardens and Pukeiti is extremely popular.
On your way to Pukeiti, call in for a stop over at Puakai Animal Farm. The children love it, especially seeing the white tiger. And look at that mountain view and the mountain ranges!Wandering through the grounds at Pukeiti Gardens – Not at flower time unfortunately
After visiting Pukeiti, it’s just a ‘short’ drive downhill towards the sea and you arrive at Oakura. The best place to go for the New Years day beach carnival. Nearby is the river that is a favourite for swimming, games and BBQ teas.
The grandsons are enjoying the river on a lovely summers day.
You can carry on driving towards New Plymouth and visit Back Beach. Its a bit of a climb down and more of a climb back up but the beach is great, and at low tide you can walk over to one of the sugar loaf islands. But make sure you get back to the mainland before the tide turns. You can get caught out very quickly and end up stuck on the island!
Right next to Back Beach is Paritutu Rock. And it’s a huge rock! I have climbed it about three times (I don’t like heights!). Robin was very game and took the grandsons to the top!
Yes, it’s not a climb for the fainthearted! But well worth the effort 🙂At the top with the view towards New Plymouth and the coast North.The wonderful view from the top of the coastline towards Oakura.
Once you get to Paritutu, you are nearly at Port Taranaki. It’s just down the road and good for a look, and then play on the black sand, or swim at Ngamotu Beach. Follow the coastal road and you come to three of our lovely well visited cafes! All with seaside views!
The boys love the breakwater. Plenty of rocks to climb and usually a fisherman or two to see the fish they catch 🙂
After a lovely stroll along the breakwater, you can find the start of our fabulous New Plymouth walkway! It is 12.7 Kms long and every step is worth the walk. There are magnificent views along the whole pathway. For all the information on the walkway please copy and paste the NPDC link below.
Robin and I with our bikes at the breakwater ready to bike along the walkway/bikeway 🙂The start of the walkway from the breakwater end 🙂One of the amazing views along the way. This one is just before you get to Kawaroa ParkThese are the rock pools at Kawaroa. The kids love to look to see if they can find crabs or starfish.This photo is getting closer to the centre of town. You can see our windwand which has become a landmark icon in New PlymouthAnd looking back towards the Port, the Chimney, Paritutu Rock and the Sugar Loaf IslandsThis is the best spot to stop and reflect on our beautiful city, the joy of the walkway and the wonderful view of the Pacific Ocean. Love New Zealand, Love New Plymouth and I love my daughter 🙂Look at the view! The walkway changes from concrete to wood at various places!You can take the path up to a car park and town or carry on towards East End Beach.This photo is taken between East End Beach and the Wind Wand walking the other directionSitting and relaxing and enjoying the view! Just what you do when on the walkway!Playing at East End Beach and the rock pools at low tide.At East End you can veer off on the Te Henui walkway. You cross over the river and walk under the main road and further along behind houses and through parks to a total of 5.9 Kms.More very picturesque moments on the Te Henui walkway 🙂Back on the Coastal Walkway and moving along to Fitzroy Beach. A great spot for swimming and playing in the black iron sand 🙂 See Paritutu, the Chimney and the Sugar Loaf Islands in the background!Look at our great Iron Sand. But be aware it gets very hot when it is dry and in the sunshineNext best place is the Waiwakaiho River mouth. A great spot for fishing!The river doesn’t mean the walkway must stop. New Plymouth has built the wonderful Te Rewa Rewa bridge. This bridge has been the object of many many photos, especially as it can be used to frame Mount Taranaki if you position your camera correctly, and the Mountain isn’t hiding behind clouds!We haven’t framed the Mountain in this photo, but the bridge still looks magnificent!Keep riding or walking the walkway and look back and this is the view of the place we started, Port Taranaki, way in the distance. And, you can still keep walking right to Tiromoana Crescent at the end of Wills Road!
Now don’t you think that the next challenge you should give yourself is to either walk the length of the Coastal Walkway or ride your bike the distance. If you don’t have a bike you can always hire one from the people that hire them out near the café between East End and Fitzroy Beaches.
One day the Coastal Walkway will eventually reach to Waitara. From our place we can already ride our bikes along Brown Road and cross the walkway bridge at the Waiongana Stream, keep riding and end up at the back of the airport.
Waiongana BridgeGrandsons throwing stones into the Waiongana Stream. It’s actually more like a river!
I haven’t finished showing off about our wonderful Coastline and beaches and favourite places to go yet! If you keep travelling north and head off to Waitara, there is another river mouth with another great Beach. The Waitara one!
Grandson playing down at the Waitara Beach on a windy day. Look at all the driftwood!While in Waitara it’s a great opportunity to go for a train trip to the Waitara Road Station and back with the Waitara Railway enthusiasts.The children love it and with the stop for refreshments, the adults do too 🙂
If you still want to see more beaches you can venture further North to Onaero River mouth and Beach, or even further and go to the Urenui River and Beach. We’ve had many a BBQ tea and swim in the Urenui River. The mud flats on the town side of the river are a great attraction for the children, not so much for the Mums trying to get the clothes/swimwear back to their normal colour, I’m afraid!
The Grandsons enjoying the Urenui river.
So there you are! There’s still heaps more to see in our wonderful city and actually the whole province of Taranaki. So next time you go on holiday, don’t forget about New Plymouth, and you can visit the places I have shown and also discover some more places for yourself.
Robin and I have just joined www.airbnb.com as a host family. We’ve already met some super people from other countries. We love being able to share our big home and have some company, but what we love the most is having the opportunity of sharing our wonderful city of New Plymouth with them.
Now can you see why I said I am really enjoying being back home 🙂
WordPress database error: [Table './wordpress/wp_users' is marked as crashed and last (automatic?) repair failed] SELECT * FROM wp_users WHERE ID = '1'
Having just spent a day wandering through Zurich, I didn’t think I could find another city in Switzerland that would thrill me more! But honestly Lucerne is wonderful, especially the ‘Old town’.
On Saturday we had booked in for a bus tour which included a trip to Lucerne and also Mount Pilatus. The tour company picked us up from our hotel at 8.30 am. We met up with the rest of the other tourists, and by 9.30 we had left Zurich and were on our way to Lucerne. The views of Zurich as we climbed the hills were amazing, and the countryside was very typical of the Switzerland I had seen in movies and on television as I was growing up.
Looking back at Zurich.Switzerland countryside. Looks lush and green 🙂Typical housing in a village as we pass throughA country Inn dressed up for the Christmas seasonMt Pilatus in the distance 🙂
We arrive in Lucerne and the first place to visit was the Lion Monument. This sculpture was made in 1820-21, and was made in honour of the nearly 700 Swiss Guard who died while defending the King in 1792 during the French revolution. The dying lion is portrayed impaled by a spear, covering a shield bearing the fleur-de-lis of the French monarchy; beside him is another shield bearing the coat of arms of Switzerland. The inscription below the sculpture lists the names of the officers and gives the approximate numbers of soldiers who died.
Me and Judy in front of the monument. Not sure why we are holding hands hehe!The monument
From there we were all taken to the Lakeside and given and hour and a half to wander around and have a snack to eat. Lucerne has two wooden bridges that you can walk over that take you from the New Town over to the Old Town, although a lot of the New town is really old as well. The whole place is just a delight to walk around. I took hundreds of photos (well not quite, but nearly). Here is a sample for you to look at and to entice you to visit Lucerne yourself one day 🙂
I’ll start with photos of the buildings…
A super wall artTall narrow buildingsLove these wallsThe town is full of magnificent designsA street fountainA lovely courtyardSuch an interesting streetLovely buildings
And now some photos of the bridges…
One of the pedestrian bridgesLooking through the wrought iron!The other side of the fenceWalking across the bridgeA sneaky view of the Bridal bridgeThe wooden Bridal BridgeLove the photo!Looking back to the smaller wooden bridgeThe bridge that all tourists come to see
Other photos from and on the bridges…
Judy walking over the bridgeSome of the art inside the bridgeThat is the new town side but lots of old buildingsLooking across to the Old TownLooking up from the smaller wooden bridgeFrom the bridge viewOne of the views from the bridgeMt Pilatus in the background
Can you see why we loved Lucerne? A most picturesque town! We both felt like we were in a dream wandering through the place. The thing that brings you back to reality is the fact that hundreds of other tourists are there as well. As many tourists as the number of people that actually live there… almost daily! It’s still worth it, we loved our visit 🙂
WordPress database error: [Table './wordpress/wp_users' is marked as crashed and last (automatic?) repair failed] SELECT * FROM wp_users WHERE ID = '1'
Well….. I have arrived! And I am so happy to be here. G7 is gorgeous and she doesn’t seem to mind that this strange lady has taken over looking after her every day while Mummy and Daddy go to work 🙂 And I am so very thankful 🙂 Imagine if she was so shy and cried every time she looked at me. Instead, when she sees my face she smiles and talks to me in her baby talk…. I love it! I am such a super spoiled Nana 😉 and I love her dearly. We are going to have so much fun together for the next three months!
I arrived Monday afternoon and C2 and D2 showed me around the local area. Three parks within a half hour walk! I ventured out for my own discovery walk Wednesday afternoon. I wanted to see what the local area had to offer a visitor from far off who was a little scared to take buses and trains yet! I found lots of little dairies, hairdressers, land agents, fruit and vegetable shops, off licenses and a mini supermarket. There is a school over our back fence, so joyful sounds of children playing are heard at play times, lunch time and after school. Within two blocks I found a very old church dated back to 1884. It was called ‘Christ Church’ and is a Baptist church by denomination. The notice board advertised bible study groups, friendship groups, the Sunday service times, and a mothers and toddlers playgroup held every Friday morning! Yay… I decided that this will be my weekly activity and also a great opportunity to meet other locals, also very good for G7 to be with other babies and help with her social development 🙂
So today is Friday! Playgroup day! Arghhhhh… And I am off!
I am feeling a little apprehensive! I don’t know anyone! New in town! A foreigner! And a little old to be a playgroup mummy! How will I fit in?
I loaded the nappy bag with everything I may need for G7. It was bulging! I had forgotten just how much stuff babies may need on outings! And off I went!
I survived and I’m now back home again….
Yay! I had a great time 🙂 This playgroup is held at ‘Christ Church’ on Bellevue Road corner. The ladies that run it are extremely friendly and caring. They made me feel very welcome 🙂 There were 12 caregivers/mummies that came along with what seemed like hundreds of kids! Man it was noisy! I’m not used to so many children’s play noises all at once anymore. G7 loved it! She happily lay on the floor kicking her feet and joined in making noises! The young mums were very friendly as well, but best of all, there were two other Nana/caregivers, who I approached as soon as I could, and then sat with for the rest of the morning. One was her first time as well, and the other her second. We happily chatted while watching and interacting with our grandchildren and other children as well. I got offered cups of tea with plastic plates and plastic biscuits, which I played along drinking up my ‘cup of tea’. It was fun!
Next week I am meeting up with Helen at the local coffee shop for coffee together before playgroup. Helen is looking after her grand daughter every Monday and Friday. She drives a little way to playgroup! Both her and grand daughter are lovely. I may have found a new friend within a week of being here. This is such a great start and I am feeling very happy and contented.
I came home with a very sleepy G7 who is now way out of routine. She didn’t want to drink her second bottle of the day with all the fun going on around her. I finally managed to get her to drink it when we got home, and she is still sound asleep. It’s now 1.15 and by now she is suppose to have had her lunch time solids and another bottle! Hopefully she will be a hungry little girl all afternoon or Mummy D2 may growl at me hehe!
I also had a lovely skype chat with my man at home in New Zealand while G7 is sleeping. This day has been so good and it is only early afternoon.
Okay G7…. enough sleep. Nana is ready for our next adventure together 🙂
WordPress database error: [Table './wordpress/wp_users' is marked as crashed and last (automatic?) repair failed] SELECT * FROM wp_users WHERE ID = '1'
Today is Friday the 12th of September and I am way behind in my blog posts! We only have 2 days left of our 16 day tour! I have missed blogging from day 2 until day 14! Sleep has been far more important than sitting up late trying to do my ‘diary’ of the day because our days have been very full, with early mornings and sight seeing filled days. We have also had very poor internet at most places. Believe me I have taken hundreds of photos, and there are many that I would love to share, but picking out the best photos and then trying to upload them would be a nightmare! So until I have spare time and a better internet, which will probably be when I am in London, I won’t even bother trying to write another blog post.
We are all healthy and happy and have had so much fun. The tour of the Baltics is not one of the most favoured tours, but it has been very interesting, and full of history. I can’t wait to write about Sarajevo and share in the photos and stories told. Dubrovnik is a place I will never forget, and the Mostar bridge!!! Anyway… more on them another day.
Leaving Dubrovnik.
It’s 11.30pm and we are off to bed listening to the far off beat of music. We are in Brasov, Romania and tonight is the night for the 2014 Romanian Music Awards! Apparently the best musicians from all over Romania are playing in the old town square right now. Flashing lights are lighting up the night sky and there are hundreds of extra people here that have come to see the live show. Lucky for us, most of the bands (perhaps all of them) are staying at our hotel… NOT! And the majority seem to be on our floor. I wonder how noisy it will be when the show has finished and they all venture back to their hotel rooms?
Oh well, we only have to be up and about and ready for breakfast at 7am! Walking tour of Brasov starts at 8am…… Nice!
Follow up… We had a great sleep. Apart from meeting a young man in his boxers in the corridor, all was relatively quiet 🙂
WordPress database error: [Table './wordpress/wp_users' is marked as crashed and last (automatic?) repair failed] SELECT * FROM wp_users WHERE ID = '1'
Okay…. Judy organised a day trip to Cesky Krumlov. I had only seen a couple of photos of this small town, but I got the idea it was a favourite tourist spot, and a MUST SEE!
Once again our interesting tour/taxi driver picked us up and drove us the two hour journey there. Was it worth the trip? Yes definitely. We had a fabulous day! It’s now very late and my bed time, but I needed to quickly add some photos! Can you quickly add photos? NEVER! Everyone else is sound asleep, and I am hiding away in the bathroom so I don’t disturb anyone, just to get these photos loaded up. The hardest thing is trying to whittle down 300 odd photos to just a few of the best ones. They are all good! But here’s a few
Found all along the pathsThe bridge walk at the castleLooking up to the castle from the villageThe weir.Looking up river to the castleLooking down on the villageI thought the open window was a great frame for this photoWe visited another town (Tabor) on the way back to Prague. The bikes/cars were on show!The church organ at Tabor‘I’m sexy and I know it’ heheThe river that meanders through the villageSuch an amazing villageThe magnificent viewThe inner courtyardThe Castle tower…. we climbed it!
What do you think? It’s amazing isn’t it. I am so pleased we visited this place. Only 19,000 people actually live at Cesky Krumlov but after today I think about that many people would also visit each week. The place was full of tourists and understandably so. You only see places like this perhaps once in a lifetime!
I am so blessed!
WordPress database error: [Table './wordpress/wp_users' is marked as crashed and last (automatic?) repair failed] SELECT * FROM wp_users WHERE ID = '1'
What a day! It was just perfect! I haven’t the words to describe just how wonderful it was. C2 scrubbed up great! D2 looked gorgeous! G3 the flower girl, and the men looked fabulous. I guess it will be easier to just show you a photo or two…
C2 and D2… So happy 🙂The men of the day, plus an extra (Nick)Three of my boys with the beautiful bride!Two beautiful girls! Grand daughter G7 and her caregiver for the day 🙂Gregory (Marysias brother) Richard (Marysias Dad) and C2The Bride and Groom sit on chairs as they say their vows 🙂And look at G3! Just beautiful….and cute 🙂Daddy and daughterYoungest son C4 with D3 🙂Brothers and sister in laws 🙂Close up of C1Gregory and D2, brother and sisterCheers! Vodka shots!A very happy C2Richard escorting D2 to be marriedThe reception tablesG3 and Felix and another cute little girlThe wedding venue, Accommodation partThe first dance 🙂A selfie with Judy 🙂Cutting the cakeThe cakePawlowice Palace. We stayed here for three nights, It’s an amazing place!
My eldest son C1 and his youngest daughter G3 xxxThe amazing Ballroom!C1 and C4 (inside the Palace)Marysia’s lovely parents 🙂
WordPress database error: [Table './wordpress/wp_users' is marked as crashed and last (automatic?) repair failed] SELECT * FROM wp_users WHERE ID = '1'
Yesterday I drove to Palmerston North to pick up our Grandsons G2 and G4. I love having these boys to stay! You only have to look through a few of my previous blog posts and you will see photos of previous holidays and details of our adventures. I have made a few plans for these holidays but today, their first day here, it is a cold, wet and windy day. So it’s inside entertainment! G2 also has a cough cold and is probably better off staying indoors and keeping warm. So first thing was a game of minecraft on the Play Station 3, and then it was break time. The boys know that Nana Pam doesn’t like them spending too long in front of the television or a computer screen! So, out came the saucepan and a batch of playdough was made for the next form of entertainment…..and they loved it 🙂 If you haven’t made playdough before I suggest you give it a try. It is so easy!
Here is the the recipe….
Stir all together
1 cup of flour
1/2 cup of salt
1 cup water
1 tablespoon of oil
2 teaspoons of cream of tartar
and food colouring (any colour)
Then cook on medium heat, stirring all the time until the dough leaves the side of the pan. Tip it out onto tray and when it cools a little, knead it all together. And then the fun begins!
Here are some photos of the boys and their playdough creations…
Our lovely new, soft, green playdoughWho would like a slice of pizza?Shhhhh it’s a bird nest with a bird in it and her eggsG4 cutting up his playdough sausage for G2’s pizzaI can see….a snail!Our Master Chef!Preparing and planning the pizza toppings
Lots of fun to be had! Playdough play lasted for about an hour and I think that is a pretty good return for the time invested in making it. And, the best part of all is that if you store your Playdough in an airtight plastic bag or container, it will last for a month or even longer.
The sun has come out to shine this afternoon so maybe we can get out on the trampoline or the bikes! But if it’s wet again in the next few days, I am sure we will be able to get our green playdough out again….even if it’s only for another hour of play 🙂


 This is what it looks like on the good side of your cushion cover


