Star Quilt

I’m a real Pinterest fan, and I love getting my inspiration for making quilts from other peoples designs. I See a picture of a finished quilt I really like, and then follow through to the web page of the creator of it. I look to see if there are instructions for making a similar quilt, and then try it our for myself. This is probably the reason why I like to write up my quilt making process, and load up some photos. I hope that someone is helped along their quilting journey, by checking out my posts on pamperstamper, or some other persons blog.

The link below was the quilt I fell in love with, and decided to copy. If you open up the link you will see that there are wonderful and descriptive instructions on how to make this design. I have also taken photos of the journey of creating my quilt. You will see the similarity 🙂

Charming Stars Quilt

1. Pick your colours. Cut out all the squares, and place them in the way that they look their best to you
2. Four of the squares in each block will need the smaller squares sewn into two corners
3. Continue to sew the smaller squares into the same patterned material. Trim to sewn edge and iron flat
4. You will end up with a pile of stitched and unstitched squares that will create your block
5. Join the rows of three squares and iron the seams in the same direction for the top row and bottom row, but the other direction for the middle row. This will help the next lot of stitching line up easier
6. You now have a completed block. Continue to do the same with the rest of the blocks for the whole quilt
7. I used the little squares that were cut off the corners to fill in between each block, and also strips of the same material as the star. In my quilt I chose white
8. Continue to join all the blocks in rows using the white strips. Make a joiner row using just the while strips and little blocks, and then join all the rows together
9. Now you can border, layer, and bind your quilt.
10. I chose to topstitch my quilt by outlining the stars and blocks. I was kind of pleased with how the back of the quilt looked. It had a pattern of it’s own

Can you believe how easy it is to make that wonderful star pattern block with just 9 initial squares of material? Having the centre block, the little squares that are cut to make the points, and the strips the same colour makes the stars stand out. This could be a great quilt for using up lots of scrap material. You could make the quilt using different materials for every block.

Maybe I could make that next time?

Now if I have encouraged you to try making this patterned quilt for yourself, please let me know how you got on. A photo of the finished product would be great. I look forward to your response.

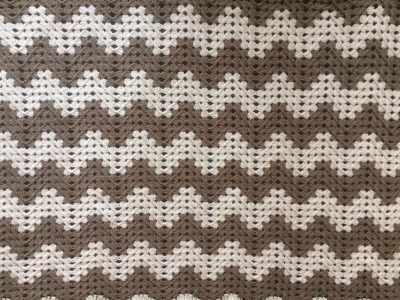
Chevron patterned Quilt

I’ve always loved the Chevron pattern. I have made two crochet blankets in a chevron pattern, and now I have also made a chevron patchwork blanket.

My first chevron crochet blanket.
The chevron pattern looks great!

This blanket was suppose to be for our youngest Grandson. He was born November 2016. I made it in pure New Zealand wool, but it ended up being so heavy. I would have to pay a fortune in postage to get it to London, where he lives. My eldest daughter now uses this blanket at work. On a cold day it is perfect to wrap around her legs and keep her toastie warm.

Great colours for a little baby boy 🙂
This photo shows the colours better

This was my next attempt, and I am really pleased with how it turned out. I made it out of acrylic, which is really great for wash and wear. It was also much lighter and cheaper for postage 🙂

Look how snuggly this blanket turned out! Little grandson is tucked up nice and warm in his Nana made blankie.

Now onto sewing Chevron. It is actually a whole lot easier than it looks. In fact with patchwork, there are often little secrets to the sewing that make the whole process a lot easier than you think. Thank goodness for that, because, by nature I am a rather impatient person, and to have shortcuts really suits my personality.

Here is the process I used to create my quilt.

Start off with two piles of square cut materials. One pile is plain fabric. I used calico. The other pile has a number of each colour. The amount depends on how big you want to make your quilt
Place the two squares together, good sides facing each other, and sew a quarter inch seam right around the outside joining the two pieces of material together
Using a cutting mat and quilting ruler, cut diagonally in both directions
You will end up with 4 new squares from each of the original squares. These ones have a join in the middle and have two different materials
Once all the squares are cut and pressed, lay them all out to work out the pattern and colour scheme you want
Sew each row together and iron the seams one way on one row, and in the opposite direction on the next row.
I keep the rows in order as I sew, so it is easier for ironing and joining
Now you sew the rows together. As you sew them together, you will notice that they fit together nicely when the seams are ironed opposite.
once the mail chevron pattern is sewn together, you can pick how you would like to border the quilt. Put the layers together and do your top stitching
I’m lucky to have a lovely big craft room with two big tables that I can spread my quilts out on. This makes putting the layers together a little easier. I love the curved safety pins that I can use to temporarily hold all three layers together while I do my topstitching.
I do all the topstitching with my cheap brother sewing machine. It has served me well, I can tell you. I roll up the quilt, and slowly feed it through as I sew. This is a process that requires lots of perserverance and patience. I do my own topstitching as I am too scroogey to pay for it to be done professionally. I’m quite happy with the finished effect.
The finished product

To finish my quilt, I did multiple rows of stitching on the outside border. I then sewed the binding on and it was complete. I love it and it has become my quilt that is used the most. I can just throw it in the washer and it comes out great. A very practical quilt that is pretty to look at as well 🙂

I hope you can follow my instructions and create your own Chevron Quilt. You can finish it off to your own liking. Please post a photo of yours in the comments below. I would love to see what you create.

Easy Zips and Binding a Cushion.

I have been sewing for years, having learnt most of my techniques from my sewing teacher at high school. That was approximately 46 years ago! Over time I have been able to sew most things, so my teacher did a pretty good job of teaching me. Having a seamstress as a sister was also pretty helpful, and she was great for giving advise or help when needed.

About 6 months ago, I decided to recover the squabs in our caravan, and looked to ‘You tube’ for instruction. I  wanted to make box shaped squab covers. I had the idea of how to make them, but watching a video of someone else sewing these covers, helped to confirm the technique. It was while I was watching them, that I saw of a new process to me, of putting zips in. And I used that process on the squab covers. It was so much easier and quicker than my old way.

Here is the process.

I am making a cushion cover and this is a fat quarter that I am using for the back of the cushion. It needs an opening for the soft pillow insert. The best way for that opening, is to put in a zip that is just under the size of the width of the cushion. I have folded over the top of the fat quarter and sewn a seam about a half inch in. This seam is sewn in the biggest stitch possible, as it will be taken out at a later date. A big stitch length is easier to unpick!

Cut open the fold

Overlock the seam edges, and press open the seam.

Now place the zip on top of the seam, making sure that the zip opening is right on top of the sewing stitches.

Sew the zip in with the zipper foot on your sewing machine. It is a little tricky around the zip pull. I stop sewing, adjust the zipper pull, and then restart sewing again.

You can see by the photo above, that I have stopped sewing about 2 inches from the edge. This is so I can undo the seam a little to allow the zip pull to move away from the sewing machine zipper foot. Now just finish sewing the zip in.

This is what it looks like on the good side of your cushion cover

Carefully use your seam ripper to undo the first seam that you made

And you now have a zip in the back portion of your cushion cover. How easy was that?

I had already made the front of the cushion cover.

As I like to bind the edge of the cushion, all I have to do is place both pieces together and overlock the edges. This helps to keep it all neat and tidy while you commence the binding.

The two pieces are held together by the overlocked edges. Note both good sides are facing out.

For the binding, I cut strips of material at 2 and a 1/2 inches wide. Place the corners at 90 degrees, good sides facing each other, and stitch diagonally across both pieces

iron the seam open

and cut the edge off to leave about a quarter inch

Press the seam open again, nice and flat 🙂

Make sure that you have enough binding to go right around the edge of your cushion. You need to leave an nice long tail as you start sewing. When you have gone around, stop about 8 inches from the start point. You will need to lay the long tail from the start on top of the binding left over at the finish. The overlap needs to be the same size as the width you cut the binding. Mine is 2 and a 1/2 inches. Cut the two and a 1/2 inch overlap and discard the rest of the binding. You can join the two together , and you will have the exact amount left to finish off binding the whole cushion.

When you get to a corner, you will need to sew up to a quarter inch before the edge. Turn the material, and sew off the corner. Fold the binding back on itself and then down the direction of the next side. You can then put the pressure foot down, and keep sewing. This will make a perfect corner when you turn the binding over to the back.

Fold the binding around to the back and stitch into the ditch on the good side. This will catch the binding on the back and sew it all down nicely. You will need to fold and turn the corners to match with the front.

Undo the zip and insert your soft pillow insert and zip up again. You now have a completed cushion to admire and cuddle up to 🙂

The challenge is for you to make one as well (or more). Follow my instructions and make a few scatter cushions for your home, or as gifts for friends and family. Please send me a photo of your creation in the comment section below 🙂

Pink Minnie Mouse Cake

I thought it would be great to show you the process I used to make G5’s 4th birthday cake.

I decided to make her a vanilla cake. It is nice and plain and yet moist and tastes yummy. I doubled the mixture and it cooked nicely in 50 minutes.

Next was to even the cake, make it level and cover with butter cream icing.

Once covered with the buttercream icing, I put the whole cake into the fridge to harden the butter so I could smooth the icing ready for the fondant.

I was a little worried here as the cake was very cold and the fondant once rolled and placed on the cake, sweated and went quite shiny. It actually worked well for adding the next layer of fondant.

White fondant placed on top of the pink, so that the Minnie mouse face will eventually stand out. I just cut it with a wavy edge.

The next step was to print out an outline of Minnie mouse a few times and then cut out the layers on the paper. These layers were placed on the coloured and rolled out fondant and cut out with a sharp tipped knife. I was pretty pleased with how easy it was to do, and how it all fitted back together.

This was going to be my finished product, but I just wasn’t happy with the bow. It should be white spots not green!

I was suppose to put a lot of white dots in various sizes around the sides of the cake, but decided that little flowers would be prettier.

G5 is pretty happy with her first look at her cake.
I brought the correct ribbon and made my own hair clip bow for the top of the cake. Bonus was that G5 has now got two bow clips to wear 🙂

The new pink bow with white spots looked great! I added white lettering to say Happy Birthday and a pretty pink number 4 candle. Around the bottom edge of the cake I rolled little balls of pink and white fondant and placed them all around.

Ella’s pink Minnie mouse cake

It turned out great, and G5 was very happy with her cake. You don’t even have to have lots of cake decorating products. I have a mat that I purchased from Ikea to roll the fondant on. This mat can roll up with the fondant on it, and then I unroll the fondant over the top of the cake. I guess that mat is my one purchase that I can’t do without. The playdoh letter cutters have been used many times, and they aren’t even sold as cake decorating things. The rest can be cut out with a paper pattern and a sharp tipped knife.

I hope that you are encouraged to give this cake a try. Let me know how yours turns out. Maybe you can add a photo of yours in the comments 🙂

The Creative Juices Are Flowing

There is nothing like a baby being born to get me in the mood to create!

Over the years I have made hundreds (a slight exaggeration) of bibs, cuddle blankets, leggings, little tops, cardigans and bootees. And, if you search through my past blog entries you will see that for my youngest three grandchildren, I made each of them a crochet blanket, and I also made them patchwork ones.

Robins niece had her second little baby girl on the 18th of April. It’s nearly a month later, and today I finally popped in to meet little Fable and give her our gift! I spent all day yesterday finishing the blanket off, and it turned out great! (even if I must say so myself) I was so happy with the finished blanket that I thought I would share the process with you, my reader. There are often little tricks with Patchwork that make something that looks very complicated, actually quite easy to put together. Of course the material choices make quite a difference to the finished product as well, and that is often trial and error. Luckily the combination of fabrics looked great this time.

Awhile ago Spotlight had a sale on and I purchased 8 different materials that would blend together, and about a quarter of a metre of each one. I then purchased two different plain fabrics that matched one of the colours in the fabric pieces. I got approximately a metre and a half or two metres of this solid colour fabric.

So here are the instructions…

Firstly I cut the 8 different materials into 3 inch strips (each is the full width of the material). I then match two groups of four strips. Here are the blue/green strips.
Keep the colours in order I sew them together with a quarter inch seam.
Keeping the colours in order, I sew them together with a quarter inch seam.
The last of the pink/yellow selection sewn together.
And you end up with two long strips, each of four different materials. Please note these have been pressed neatly. I have my iron out and going the whole time I sew, and press the materials frequently.
Now to measure and cut. Even up the ends of the strips first.
You need to cut the material up as wide as it is high, right along the long strip. I got four big squares off each one.
Here are the two groups of four squares.
Keeping the patterns in order line them up beside each other with one colour group having its stripes going at a 90 degree angle.
Put the two different ones together with the right sides facing each other and sew a quarter inch seam right around the outside of the square.
Sew neatly around the outside edge :-)
Sew neatly around the outside edge 🙂
From corner to corner cut with your rotary blade, then spin around and cut the opposite diagonal.
You should end up with your large square cut into four like this!
Press the seams and turn over. Voila! Look at that! Aren't they so pretty! These four have been placed making a little mixed square in the centre.
Press the seams and turn over. Voila! Look at that! Aren’t they so pretty! These four have been placed making a little mixed square in the centre.
Or you could place them with the little triangles to the outer corner. Or you could mix them up totally. The last way is extremely hard to keep control of when sewing together. I get lost! So I kind of like to still have some order (among the chaos).
Once all four big squares have been cut up, place them together again in the way that you want to sew them up.
Sew up each row making sure to press the seams once finished.
Then sew the four rows together. Don't they look pretty :-)
Then sew the four rows together. Don’t they look pretty 🙂
On this blanket I chose the green with little pink flowers for the first border. Sew on the top and bottom first and then the edges. Make sure to slightly stretch the material as you sew. This makes it easier for the quilt to keep shape, and for the top stitching later on.
On this blanket I chose the green with little pink flowers for the first border. Sew on the top and bottom first and then the edges. Make sure to slightly stretch the border material as you sew. This makes it easier for the quilt to keep shape, and for the top stitching later on.
My next border was a very cute yellow tree pattern sewn exactly the same way as the green border.
Because this is a smallish quilt (or blanket) there is no need to top stitch through all layers. On this one I have added the wadding to the back, and if you look closely, I have top stitched through both of the layers. This keeps the blanket looking neat and holding together well after many washes. There are many ways that you can top stitch on a quilt. I have just made quarter inch lines alongside the seams and it looks very tidy.
Because this is a smallish quilt (or blanket) there is no need to top stitch through all layers. On this one I have added the wadding to the back, and if you look closely, I have top stitched through both of the layers. This keeps the blanket looking neat and holding together well after many washes. There are many ways that you can top stitch on a quilt. I have just made quarter inch lines along each side of the seams and it looks very tidy.
Now I have added the backing and finished the outer rows of top stitch through all the three layers.
The next stage is the binding. I cut three inch strips and joined them together to make one big long strip. Fold it in half and iron the fold.
With the cut edges together sew the binding on stopping about a quarter of an inch from the corner and sew diagonally off the edge.
Turn the cloth around and fold the binding to have a straight edge along the top, then just recommence sewing the seam.
Iron the binding out from the edge and fold it around to the back. At the corners fold the binding in the same way as you did when you were sewing and they will just fit together nicely. I then stitch in the ditch on the front of the blanket, and it catches the back and sews the binding down neatly. you can hand stitch this part if you want the stitching to be completely hidden.
And here are the two quilts that I made in two days. I must admit that each one took all day, but they were wet days and not a lot else could be achieved, except housework! And that is always there anyway!
And here are the two quilts that I made in two days. I must admit that each one took all day, but they were wet days and not a lot else could be achieved, except housework! And that is always there to do anyway!
All folded up ready to be given to two very special little babies. Fable got the green edged one, and Zoe got the pink edged one.

Now I find that there is no greater pleasure than to give a gift that you have hand crafted. I pour my love into the blanket as I sew it up and I imagine the little baby that I am making it for, laying on it, kicking their little feet happily. I pray a little blessing on the child and hope that the Mummy enjoys seeing her child playing on the pretty blanket.

I also get a great sense of satisfaction seeing how the colours and patterns fit together. These two blankets had the inside panels the same and yet the outside borders were completely different creating a unique blanket for each child.

I hope that the instructions are clear enough and you can now be bold enough to attempt your very own patchwork quilt or blanket. Let me know how it goes! Send me a photo of your one finished so I can enjoy the colours and patterns that  you have created.

ENJOY 🙂

It’s a Pom Pom making day

Another wet day in the Naki! And another day to entertain the grandsons indoors. I taught grandaughter G3 how to make a Pom Pom the last time I was in Sydney, so thought that it was the perfect opportunity to teach the boys as well.

Pom Poms are really easy to make and are a great way of using up all your old balls of wool. Especially if you only have one ball left of a colour, or a batch, or there isn’t enough to make a whole garment.

If you’ve never made a Pom Pom before, here are the instructions…

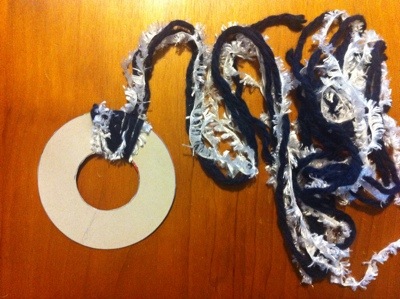
Cut out two circles of cardboard with another circle cut out of the centre

20140713-172040-62440398.jpg

Put the two circles together and start winding the wool around and around.

20140713-172204-62524387.jpg

Keep adding more and more wool until the centre is full.

20140713-172309-62589951.jpg

Complete filling it up using a darning needle with a super large hole threated with the wool.

20140713-173612-63372021.jpg

Now the tricky part! You have to cut the Wool between the two circles just like the photo below

20140713-174006-63606942.jpg

Wind a piece of wool between the circles and tie it tight so it will hold all the cut wool together

20140713-174225-63745479.jpg

Rip off the cardboard circles and do a little trimming to neaten it up and voila! You now have a Pom Pom!

20140713-185512-68112480.jpg

Our Pom Pom was thrown around as a soft inside ball. Great entertainment for two active boys.

20140713-174614-63974611.jpg

And when the fun of a new Pom Pom had worn off Maisy the dog found it on the lounge floor. She was loving it! Tossing it around like it was made just for her! If I hadn’t rescued it I imagine it would have been destroyed in no time!

20140713-184900-67740634.jpg

All in all our Pom Pom making experience has been quite fun! G2 wanted to make another one straight away. He loved the idea of using a needle but I was happy with just one big Pom Pom for awhile. Perhaps we can make another the next wet day 🙂